Posts

Showing posts from November, 2015

Ubuntu server ssh

 [원격접속 환경 구성]  sshd ( 원격 접속 데몬 ) 설치와 실행 morenice@ubuntu:~$ sudo apt-get install ssh morenice@ubuntu:~$ sudo /etc/init.d/ssh start  * Starting OpenBSD Secure Shell server sshd                               [ OK ] 시작프로그램 등록 /etc/rc.local에 등록하여 부팅 때 마다 ssh 서버를 실행되도록 설정.     morenice@ubuntu:/etc$ sudo vi /etc/rc.local #!/bin/sh -e # # rc.local # # This script is executed at the end of each multiuser runlevel. # Make sure that the script will "exit 0" on success or any other # value on error. # # In order to enable or disable this script just change the execution # bits. # # By default this script does nothing. # start ssh server /etc/init.d/ssh start exit 0 [원격 소프트웨어 Putty]   http://www.putty.org/  Free 다운로드  윈도우 환경의 개발에서 리눅스에 원격 접속을 하기 위한 소프트웨어로서, 원격 접속 할 대상의 서버에서는 sshd 라는 원격 접속 데몬이 실행 되어 있어야 원격접속이 가능하다. [Putty를 사용하여 원격 접속하기]  대상 서버의 IP가 필요함으로 윈도우에서는 ipconfig 리눅스에서는 ifconfig 명령어를 사용하여, IP정보를 얻어야 함. morenice@ubuntu:~$ ifconfig eth0      Li

전자정부 EgovMap Xml Jsp

<?xml version='1.0' encoding='utf-8'?> <%@ page contentType="text/html; charset=utf-8" pageEncoding="utf-8"%> <%@ page import="java.util.List,acdn.welvt.elvtr.service.ElvtrSpecVo"%> <%@ page import="egovframework.rte.psl.dataaccess.util.EgovMap" %> <web> <% List<EgovMap> troubleList = (List)request.getAttribute("troubleList");  System.out.println("jsp"); if (troubleList != null) { for (int i = 0; i < troubleList.size(); i++) { EgovMap pnMap = (EgovMap)troubleList.get(i); out.print("<trouble_detail>"); out.print("<trouble_sn>" +  pnMap.get("troubleSn")+ "</trouble_sn>"); out.print("<defect_dt>" + pnMap.get("defectDt") + "</defect_dt>"); out.print("<defect_type>" + pnMap.get("defectType") + "</def

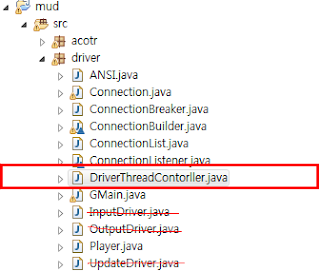
6. mud study DriverThreadController

Image
package driver; import java.io.IOException; public class DriverThreadContorller implements Runnable{ String driverName ; ConnectionList connectionList; public DriverThreadContorller(String name, ConnectionList connectionList) { driverName = name; this.connectionList = connectionList; System.out.println("DriverThreadContorller"); } @Override public void run() { // TODO Auto-generated method stub try { while(true){ for(Connection conn : connectionList.getConnectionList()){ driverThread(driverName,conn); } } }catch(InterruptedException e){ System.out.println("InterruptedException driver name : "+driverName); e.printStackTrace(); }catch (Exception e) { // TODO: handle exception System.out.println("Excetpion driver name : "+driverName); e.printStackTrace(); } }//run private void driverThread(String driverName,Connection conn) throws IOException, InterruptedException{ String str="

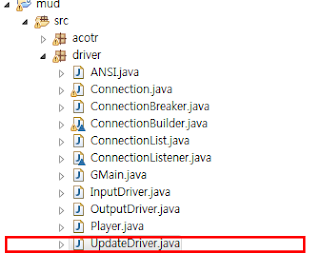
5. mud study UpdateDriver (exit, quit)

Image
package driver; public class UpdateDriver extends Thread{ private ConnectionList connectionList; public UpdateDriver(ConnectionList cl) { connectionList = cl; start(); } @Override public void run() { // TODO Auto-generated method stub while(true){ for(Connection conn : connectionList.getConnectionList()){ CustomBuffer cbff = conn.getInputBuffer(); String input = cbff.getBuff(); if(null != input && !"".equals(input)){ String[] cmd = input.split(" "); if("quit".equals(cmd[0])||"exit".equals(cmd[0])){ new ConnectionBreaker(connectionList, conn); } } } try { sleep(5); } catch (InterruptedException e) { // TODO Auto-generated catch block e.printStackTrace(); } } } } ===========================================

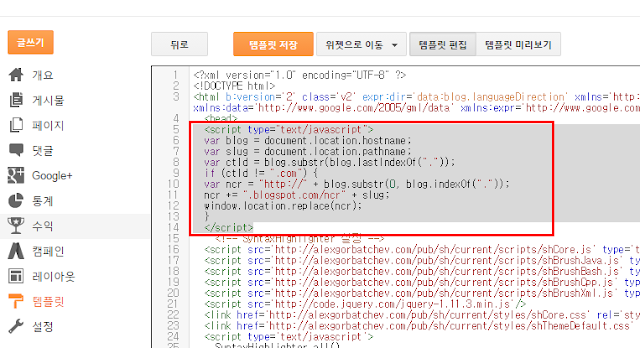
구글 블로그 blogspot.com 으로 접속하게 만들기

Image
1. 템플릿>HTML 편집으로 들어가서 <head> 밑에 소스를 붙여 넣기 하면 된다. 아래는 적용 후 모습

티스토리 vs. 구글 블로거

Image
구글 블로거는 다음과 같은 장점이 있다. 1. 블로그 무제한 생성! 티스토리는 5개 제한이 있지만 구글 블로그는 생성 갯수에 제한이 없다. 그래서 본인과 같이 폭넓은 카테고리를 섭렵하는 사람에게는 상당히 유용한데, 각각의 카테고리별로 블로그를 생성해서 메뉴로 묶어주면 편리하게 사용할 수 있다. 개인적으론 5개의 블로그로는 부족해서 구글 블로거로 옮기게 된 주요한 이유 중 하나라고 할 수 있다. 그리고 블로그들을 메뉴로 묶어주기도 편리하게 되어있다. 티스토리도 요즘은 메뉴기능을 지원하지만 구글 블로거 보다는 융통성이 좀 떨어지고 그나마 예전 스킨들에는 메뉴기능이 없다. 이런 경우 일일이 코드 손봐서 메뉴를 만들어줘야 하는데 초보는 어려울 뿐더러, 만들 줄 알아도 수정하거나 할 때 상당히 불편하다. 2. 카테고리 대신 레이블(Label) 구글 블로그에는 카테고리가 없다. 대신 "레이블(Label)" 이라는 개념이 있다. 레이블은 티스토리의 "태그" 기능 처럼 글쓰기 화면 하단에 써 넣는 자리가 있는데, 이 레이블 별로 블로그상에서 카테고리처럼 정렬시킬 수 있다. 이 블로그 왼쪽 상단에 카테고리 처럼 정렬된 것이 레이블이다. 이게 왜 좋은가 하면, 하나의 포스트에 여러개의 레이블을 적용할 수 있다는 것이다. 티스토리의 카테고리는 하나의 포스팅은 원하는 카테고리를 지정하면 적용되는 방식이라 반드시 하나의 카테고리에 소속되게 되는데, 레이블은 태그처럼 적어 넣는 방식이라 여러개를 적어 넣으면 여러개의 레이블에 소속되는 것이다. 나에게 이 기능이 왜 중요하냐면, 예를 들어 게임자료를 제공하는데 그 게임의 장르가 슈팅이기도 하고 퍼즐이기도 하다면 하나를 선택하기가 애매할 뿐더러 방문자가 검색할 때에도 불편함이 있다. 레이블 개념은 나에게 있어서는 상당한 도움이 되고 있다. 3. 더보기(Jump Break)를 이용한 애드센스 적용 이것은 티스토리에도 있는 기능이지만 약간 차이가 있다. 티스토리의 것은 &qu

4. mud study InputDriver

Image
package driver; public class InputDriver extends Thread{ private ConnectionList connectionList; public InputDriver(ConnectionList cl) { // TODO Auto-generated constructor stub connectionList = cl; start(); } @Override public void run() { // TODO Auto-generated method stub while(true){ try { for(Connection conn : connectionList.getConnectionList()){ if(conn.getInput().ready()){ String input = conn.getInput().readLine(); if(input !=null){ System.out.println("inputDriver : "+input); conn.getInputBuffer().addBuff(input); } } } } catch (Exception e) { // TODO: handle exception } try { sleep(5); } catch (InterruptedException e) { // TODO Auto-generated catch block e.printStackTrace(); } } } } =================================================================================================================

3. mud study Connection

Image
package driver; import java.io.BufferedReader; import java.io.IOException; import java.io.InputStreamReader; import java.io.PrintWriter; import java.net.Socket; import java.util.LinkedList; import lombok.Getter; public class Connection { private Socket socket; private @Getter PrintWriter output; private @Getter BufferedReader input; private @Getter Player player; private @Getter CustomBuffer inputBuffer; private @Getter CustomBuffer outputBuffer; private @Getter boolean isConnected; public Connection(Socket s, Player p){ try { socket = s; output = new PrintWriter(socket.getOutputStream(),true); input = new BufferedReader(new InputStreamReader(socket.getInputStream())); player=p; inputBuffer = new CustomBuffer(); outputBuffer = new CustomBuffer(); isConnected = true; } catch (IOException e){ // TODO: handle exception e.printStackTrace(); } } public synchronized void send(String message){ outputBuffer.

LinkedList Example

public class LinkedListExample { public static void main(String[] args){ //LinkedList => LinkedList LinkedList linkedList = new LinkedList (); linkedList.add(new Connection()); linkedList.add(new Connection("turtle",false)); for (int i =0; i itr = linkedList.iterator(); while (itr.hasNext()) { Connection conn = itr.next(); System.out.println("itr : "+conn.toString()); } System.out.println("before : "+linkedList.size()); System.out.println(linkedList.poll().toString()); System.out.println(linkedList.poll()); System.out.println("after : "+linkedList.size()); } } @ToString @Getter @Setter class Connection { private String name; private boolean isConnection; public Connection() { // TODO Auto-generated constructor stub this("test",true); } public Connection(String nm, boolean conn) { name = nm; isConnection =conn; } } =============================================

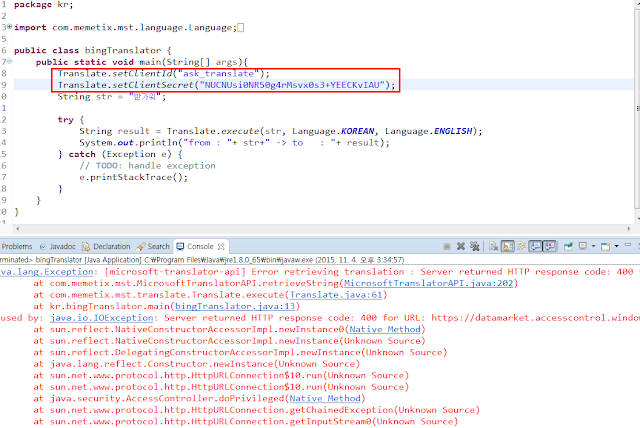
Server returned HTTP response code: 400 for URL: https://datamarket.accesscontrol.windows.net/v2/OAuth2-13 (Bing Translator API error)

Image
java.lang.Exception: [microsoft-translator-api] Error retrieving translation : Server returned HTTP response code: 400 for URL: https://datamarket.accesscontrol.windows.net/v2/OAuth2-13 ========================================================== client id 또는 client secret 값이 틀려서 발생한 에러였다. url :  https://datamarket.azure.com/developer/applications  에서 값을 확인 해보자.

2. Bing Translator API example

Image
============================================== source : package kr; import com.memetix.mst.language.Language; import com.memetix.mst.translate.Translate; public class bingTranslator { public static void main(String[] args){ Translate.setClientId("ask_translate"); Translate.setClientSecret("NUCNUsi0NR50g4rMsvx0s3+YEECKvIAU"); String str = "반가워"; try { String result = Translate.execute(str, Language.KOREAN, Language.ENGLISH); System.out.println("from : "+ str+" -> to : "+ result); } catch (Exception e) { // TODO: handle exception e.printStackTrace(); } } } Bing Translator API register URL : http://ask39.blogspot.kr/2015/11/1-bing-translator-api-register.html 에서 ClientId와 ClientSeret 받았다면 jar파일을 받아야함. Jar URL : https://code.google.com/p/microsoft-translator-java-api/

1. Bing Translator API register

Image
1.  https://datamarket.azure.com/account  로그인 후 기본정보 입력 후 다음을 누르면 우측 상단에 2,000,000 characters를 선택(무료) 2. https://datamarket.azure.com/account/datasets  에서 그림과 같이 확인  3.  https://datamarket.azure.com/developer/applications/register  에서 등록절차 진행  - Client ID와 Client secret 값은 개발할때 필요하니 따로 저장해 둔다. 등록이 완료되면 아래와 같이 활성화 됨. translatorAPI example url : http://ask39.blogspot.kr/2015/11/2-bing-translator-api-example.html

Maven pom.xml Dependency add 에서 search가 안될 경우

Image
1. window - PreFerences - Maven - Download repository index updates on startup 체크 후 ok 2. 이클립스 재시작 후 index를 자동 다운 3. 다시 검색해보자.

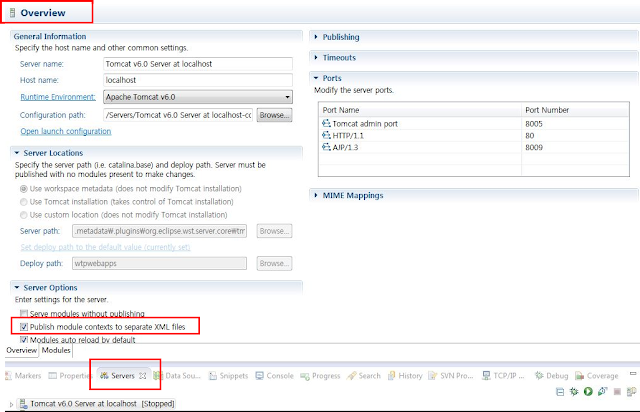
[SetPropertiesRule]{Server/Service/Engine/Host/Context} Setting property 'source' to 'org.eclipse.jst.jee.server:projectName did not find a matching property

Image
[SetPropertiesRule]{Server/Service/Engine/Host/Context} Setting property 'source' to 'org.eclipse.jst.jee.server:etis did not find a matching property  Servers >  Server Overview >  Server Options  ​ Publicsh Mode contexts to separate XML files    (checked)

An incompatible version 1.1.6 of the APR based Apache Tomcat Native library is installed, while Tomcat requires version 1.1.17

Image
url :  http://archive.apache.org/dist/tomcat/tomcat-connectors/native/ 위 링크에서 tcnative-1.dll 파일 다운 후 java 디렉토리 아래 bin폴더에 복사

eclipse Window Builder (GUI)

Image
1. eclipse>help>install new software click 2. work with : http://dl.google.com/eclipse/inst/d2wbpro/latest/4.3 3. 모두선택하여 설치 레이아웃을 코딩이 아닌 GUI 환경으로 구성하여 빠르게 개발